How to add related posts to the bottom of Squarespace blog posts - video tutorial
My friends, I've got another video tutorial coming your way today!
In today's article, I'm going to show you how to add related posts to the bottom of your Squarespace blog posts. I've included written instructions (images included, of course) to go along with the video that walks you through the process so you can learn whichever way your prefer!
Adding related posts at the bottom of your Squarespace blog posts is an important step everyone should take to make sure that their websites are running as smoothly as possible. Not only do related posts encourage your readers to stick around your site longer, it also directs them to content they might also find useful.
You already know I'm a huge fan of Squarespace and they make the process of adding related posts super simple thanks to their click-and-fill summary blocks! There are so many ways you can customize the related posts summary blocks which is great if you want to hone in on design and the content you're providing your readers.
How to add related posts to Squarespace blog posts
Video Tutorial
Adding related posts to the bottom of your Squarespace blog posts couldn't be easier. Watch the video above or follow the instructions below. In this example, I have added a Carousel Summary Block.
Step 1 : Open blog post
To add related posts to the bottom of Squarespace blog posts, the first step is to open up the blog post you wish to edit. Go to Pages > Blog > select Edit on a blog post.
Step 2 : Add Summary Block
At the bottom of the blog post, click an Insert Point (the little icon that looks like a circle with a point on the right which appears when you hover over content or an area) and select Carousel from the Summary Block section.
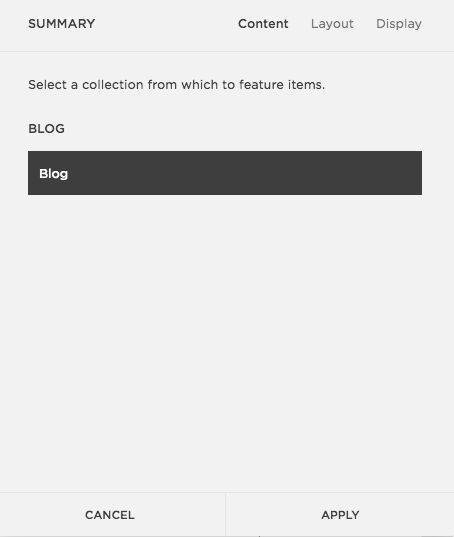
Step 3 : Select Blog Content
In the content tab, select Blog
Step 4 : Edit the Layout
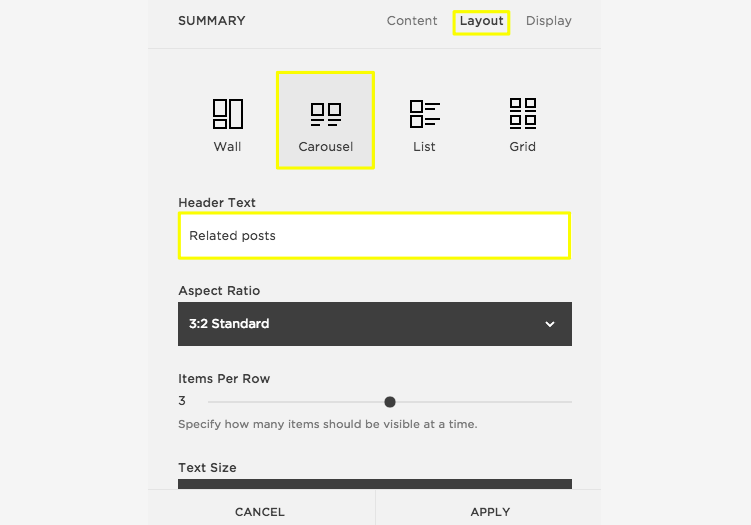
Next, toggle over to the Layout tab so that you can edit how the related posts in the carousel summary block will appear. Update the Header Text field to say "Related Posts" (or whatever you want it to say) and make any other changes you want. Personally I like to change the Aspect Ratio to 1:1 Square and leave the rest of the fields as is.
Step 5 : Edit the Display
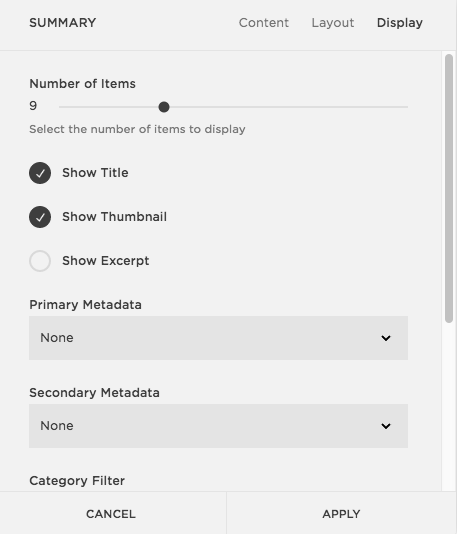
From here, toggle over to the Display tab and select the type of content you want displayed with each related post link. Personally, I change the number of items to 9, only show the Title & Thumbnail options, and do not display any primary or secondary metadata, which you can see in the screenshot below.
Still on the Display tab, scroll down to the Category Filter and Tag Filter. It's important to fill this section out by selecting the Category or Tag you want to display since it's through here that you'll be directing readers to relevant content to what they're currently reading. In the screenshot below, I've selected Web Design from the Category Field so that similar posts will display in the Related section below my blog post. is block will represent posts related to the post you’re currently editing, choose a category or tag relevant to the current content.
Step 6 : Apply to Save Changes
Click Apply to save your changes.
After you've created or edited your blog post, click Save to save the posts as a draft, or click Save & Publish to share the post immediately.
Note: You must repeat these steps for every blog post to which you want to display related posts links.
Final Thoughts
Adding related posts to each blog post is a small step that has a huge impact to your website! Not only are you providing readers with useful content, it will encourage them to stay longer on your site and really get a feel for the content you've created. It might take you a little bit of time to set up related posts the first time but rest assured, soon you'll be a speedy whiz and it'll become part of your blog writing routine!
Now it's your turn: do you use related posts in your Squarespace site? How have you set them up or customized them? Did you find this tutorial helpful? I'm trying out this new format and would love your feedback. Leave me a note in the comments!
MORE SQUARESPACE TUTORIAL VIDEOS
- How to disable the escape key login on your Squarespace website
- How to add and style social share buttons on your Squarespace website
- How to add Pin It buttons to your Squarespace website
- How to add and style a popup on your Squarespace website
- How to add and customize a form on your Squarespace website
- How to add and customize a Squarespace announcement bar
- How to name photos for increased SEO in Squarespace
- How to add and remove pages from the navigation in Squarespace
- 4 Squarespace templates I recommend for business websites
- How to add videos to your Squarespace website
- How to use tags and categories in your Squarespace blog
- Favicons: how to create one in Canva and upload it to your Squarespace website
- How to set up a blog on a Squarespace website
- How to connect social media accounts to your Squarespace website
- How to easily find out which Squarespace template a website is using
- How to update and edit banner images in Squarespace
LAUNCH YOUR BEST SITE - FREE ECOURSE
Interested in learning more about what it takes to get a website up and running? Sign up for my free 7 day e-course!


